Wednesday, 26 August 2020

Porsche 911 (996 and 997) convertible cabriolet roof fix. Not opening or closing due to hydraulic fluid leak repairs DIY fix

 During 2019, the roof in the 911 was getting slower to open and close. Checking the hydraulic fluid reservoir, it was slowly dropping indicating a leak somewhere. No big deal, I'd top it up, and all would be well for a few months.

However, November 2019 I found a big puddle of hydraulic fluid in front of the rear left wheel - clearly a big seal had gone somewhere.

This is a reasonable common problem, especially on a 20 year old convertible.

The basics is that there's a hydraulic reservoid (only holing maybe 140ml or so of fluid, with the same amount stored in the hydraulic lines and actuators). However the seals eventually go bad with time. As they crack and leak, you lose fluid, to the point that there's nothing in the reservoir and so the roof won't open or close. A little leak can be topped up, but it's not a proper solution.

So I ordered a replacement seal kit on eBay, and waited until now (Aug 2020) for a global pandemic to shut my workplace down so I'd have some free time to get everything done.

For my loooong video see below!


Tools required 

10, 12, 13mm sockets/wrenches, 5mm allen key. Torx bits to remove rear speaker grilles. Some hydraulic fluid and a curved syringe or similar to refill the reservoir.


To get to this point, hopefully when you hit the open/close button, the clamshell will retract. Stop the process when the clamshell is back as far as possible. Look under the rear window and unclip the retaining clips on either side then fold the roof back on iself. There's 4 plastic clips to pop off, then lift the carpet out.


Now, if you just wanted to check the hydraulic fluid level, you can see it dead centre - that cylinder thing - or more accurately the white plastic reservoir underneath it. There's a 5mm allen key to remove the plug, and you can refill the reservoir.


On my 1999 model, the electric motor to move the clamshell is right up against the hydraulic pump. To remove this, unclip the connecters, there's a couple of 10mm bolts holding the motor onto the angled bracket. There's also some weird plastic cone stuck behind the bracket, yank on it gentle to remove. Then use straps or rope to retract the motor out of the way. Follow the lines to the side and there's a couple of cable ties to snip and remove.


Inspecting the rear left hydraulic cylinder/actuator. 


There's a metal bar connecting the cylinder to the roof with some clips - these are removed by lifting the clips with a flat screwdrive. 13mm bolts on each end of the actuator itself. Remove the inside rear speaker cover to easily access the other end of the rod.

Be careful when removing the left cylinder, there's a projection to the left that fits in with a plastic arm that connects to a potentiometer. This tells the car what position the roof is in, so it can co-ordinate the movements, latches, clamshell etc.


Right hand side cylinder. There's no potentiometer arm on the right side, but when you remove it, you'll see the channel where a guide pin on the cylinder slides along. If you look down the end, you can see the rear speaker. From inside the car, remove the rear speaker grille (just 2 torx screws) and you can access the other end of the cylinder to unbolt and remove.


Main hydraulic fluid reservoir. Not easy to tell, but that white tank is almost totally empty.


After removing the 13mm bolts holding the cylinder in. There are some clips that hold the hydraulic lines in place.


When it comes to disconnecting this end, it's colour coded. Use a 12mm socket to loosen the bolt, and be careful not to loose any of the washers! There's a big one nearest the pump, and thinner washers between each connection and the main bolt. The bolt with the 5mm hex in between is where you refill the fluid.


Removed from the car, you can see the extent of the leaking seals. You can also see the wire clip on the inside of the cylinder, and I found these difficult impossible to remove myself, so I took the cylinders to a hydraulic repair shop with the new seals to replace.

This is the only step in the repair I had to outsource. Some people have drilled holes through the cylinders to push them out. If you've got as far as removing the cylinders from your car but can't get the seals done yourself, just google  "hydraulics repair" in your area. Apparently using tiny screwdrivers or picks, you can manage it yourself. However if you gouge or scrape the rods, there will be a constant but small leak after that, so be careful!


Be careful not to kink or crush the hydraulic lines, or risk further leakage!


After receving the cylinders back, these are the original seals removed from the cylinders. New O-rings already installed and tested.


This is the fluid used to refill the fluid reservoir. Get CHF11S and you should be fine.


Installation is the reverse of removal. I had to refill the reservoir, run the top up and down a few times, then refill the reservoir again. Will check fluid levels after I've run the top a few dozen times more, and it may take time for the air bubbles to bleed out of the fluid and for the system to completely fill.

It's great to have the roof working again - even though it's the middle of winter here right now. The satisfaction of doing it yourself, understanding the intricacies of the mechanism, troubleshooting - and of course, not paying someone else to do it!


Friday, 5 October 2018

Porsche 911 996 fix low battery charging voltage problem - replacing starter-alternator Y cable, changing drive belt

So another annoyance I had was that my 911 would charge the battery at 14V when I initially started the car, then as it warmed up (after about 20 minutes) the voltage/battery meter would gradually reduce to 13V, then just a tick above 12V - clearly not a good long problem to have!

The most likely suspect was a bad starter/alternator cable. After some years, corrosion would set in. not a problem when the cable was cold after the car was started, but after the temperature increases, the corroded cables' resistance would increase, meaning less charge to the battery.

So here's how I tackled it. Usual disclaimers apply - I'm not a mechanic, all photos and descriptions provided are for amusement value only, any damage to your car or yourself is your own damn fault.

Parts required;

  • New starter-alternator Y cable. About AUD$180 delivered from USA, as no local sellers had it.
  • New drive belt. About AUD$40 on eBay. Cheap to replace as general maintenance.
  • New alternator regulator - about $100 on eBay. Possibly not required, but seeing as I would have to get the alternator out anyway, a useful part to replace


 First things first - disconnect the car's battery!


So, let's get started. Note my 911 came with a silicon intake tube/resonator delete. Remove the airbox by loosening the clamp around the throttle body, and the single bolt near the boot latch. Unplug and set aside the MAF connector


Remove airbox from car and set aside


This exposes the drive belt.


To release the drive belt, ideally get a socket on this tensioner pulley and rotate (think it was anticlockwise) to loosen tension. Don't use a wrench as in this photo, get the correct fitting socket to avoid slippage and damaging anything - I think it was a 21mm.


Drive belt will easily come off all pulleys. You probably should take a picture of the original routing before removing it.


Removing the alternator can be a bit of a pain. This bolt I'm pointing at is easy to loosen. Then to the right of the alternator is a pulley on a bolt. Loosen the bolt on this pulley, but don't fully remove it. Look carefully at the other end of the bolt, where it's set into a bearing. Smack the bolt with a hammer to dislodge the bearing, otherwise you'll never get the alternator out.


Now I ran into a problem - a tiny coolant line just in front of the alternator sprung a leak.


This stupid little thing. I do wonder why "German engineering" is so terrible that all their coolant plastics deteriorate (yeah I'm looking at you, VW, Audi, Porsche, BMW, Mercedes), whereas my Japanese cars are build much with much much better reliability and longevity?

This stupid thing.


Aaaaand there it goes. Off to the local auto shop to grab some brass barbs to replace crappy German engineering.


Anyway, once the main bolt holding that pulley on comes loose, rotate the alternator out.


You did remember to disconnect the battery, right? There's a small harness that just unclips, then the main power cable you need to unbolt.


Now clearly someone's already had a go at fixing the problem - that red heatshrink is not OEM.

You can see the power cables to the starter motor (both wrapped in red heatshrink). Unbolt and remove from the starter.
 

You'll need a long extension or two to get to the boilt on the starter. You may also consider replacing the starter. 

Back to the alternator. Let's replace the alternator regulator now. The screws and bolts to remove the cover are obvious to see. Don't strip any.


Cover removed.


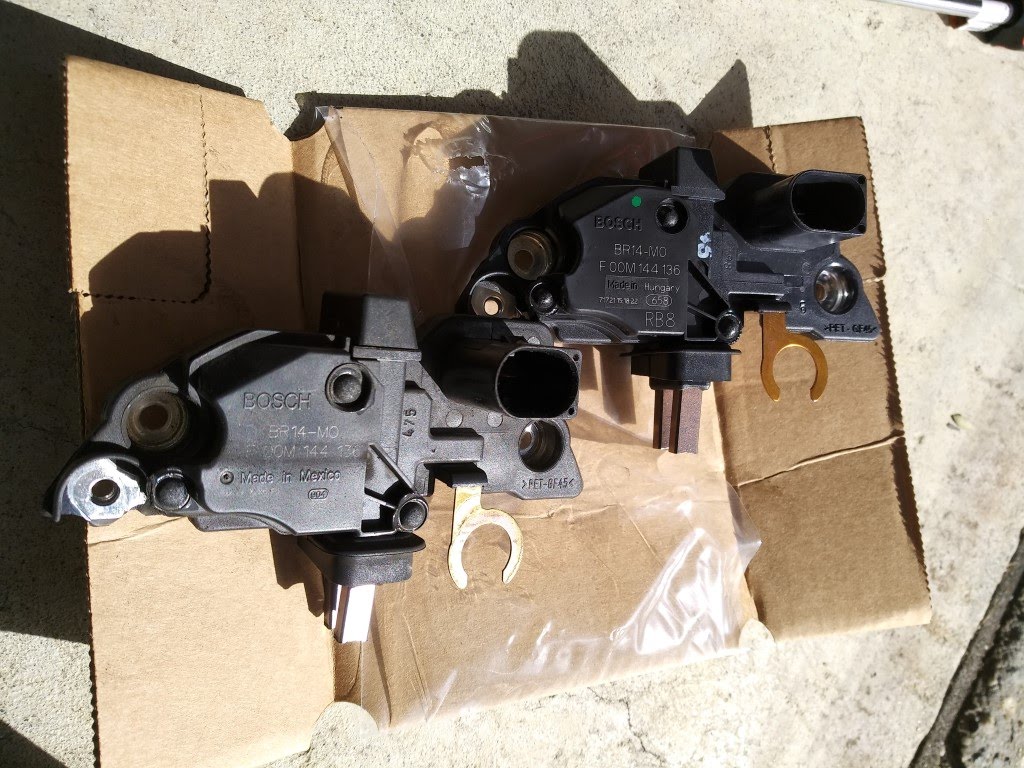
Old vs new alternator regulator. Install new regulator and replace the cover.


This car won't run very well in this state. Let's move on to fixing it.


Here's the new replacement cable. It's from a later 997, but will fit the 996.


Here's a big tip - get a bowl of hot water, immerse the black plastic box in it a few minutes, then gently pry it off the cable. Why do you really really want to do this? It means you won't have to remove the aircon compressor!


So here's the original B+ connector.


Unbolt and remove.


Old (left) vs new alternator-starter cable. By removing the black plastic box, you can thread the cable under the intake runners to the original B+ location, replace the plastic box and bolt it up. Then bolt the connector to the starter, final connection to the alternator.

As all great car manuals will now say, reinstallation proceeds in the reverse order.

However....


Don't forget to make sure all your vacuum connections haven't been disconnected by accident! I managed to dislodge this one, put my car back together and it ran very poorly with lots of backfiring - had to disassemble everything again, found this hanging loose, and took a while to figure out it plugs into a connector underneath the intake runners. Reassembled everything, and all was good again


Back to that stupid plastic coolant connector. I used clamps to close off the hoses to make sure no broken plastic was retained in the hoses, then removed the broken plastic and rinsed any more debris.


Used a double ended brass barb to replace the broken part plus hose clamps.

In summary, not a particularly difficult job if you have the tools available and a bit of patience. Once I'd figured it out, I think I could do this job start to finish in around 90 minutes.

Finally, take the car for a long drive and see what voltage reading you get. I started at 14V as before, and at hot temperatures it dropped a little to around 13.5 or so. In hindsight, I should've measured it before and the cable replacement using a multimeter at the battery.

Sunday, 29 July 2018

porsche cayenne turbo 955 v8 exhaust bypass DIY guide

Love the sound of my cayenne turbo - but it's a pity you can only hear that V8 burble when you're right at the exhaust.

Many people have done an exhaust bypass - it's actually quite a clever and simple (and really cheap!) way to open up the sound of your engine!

What we're doing here is bypassing the rear muffler, by sliding some flexible pipe inside the muffler so the exhaust gases aren't muffled and pass straight through - so tell all your mates you've straight-piped your cayenne!

Tools and parts required

Instead of buying a new exhaust system, all we need for this exhaust bypass is...

  • Gloves and a mat to lie on
  • 15mm socket and/or wrench
  • To clean your exhaust: metal polish, rags, a rotary tool of some kind or wire brush
  • 2" (50mm) internal diameter flexible exhaust hose/pipe, about 1m long in length. A hacksaw or other tool to cut this pipe in half.

So, this is the standard appearance. A bit dirty! I've raised the car up as high as possible on the air suspension which gives plenty of room to get underneath.

Looking up under the exhaust tips, you'll see this clamp with a 15mm bolt on it (Some people have found theirs is 16mm though). Spray a bit of WD40 or equivalent, then crack it open and unbolt this clamp, then remove exhaust tips.


Put your filthy exhaust tips aside for the time being.


Now on my car (Australian spec Cayenne Turbo) there were these little pipe/projections visible in the rear muffler, and I was unlucky enough to have them on both sides. Some people report being able to remove these pipes by sawing away at them with a hacksaw blade - didn't work for me. I tried a dremel with every tool, no good either. Ultimately the only way for me to remove them was with a metal hole-saw attached to an electric drill. The holesaw got destroyed in the process, but at least these pipes came out!


Seriously, getting these little things out was the hardest part of the whole process. You could also use a small reciprocating saw with a long enough metal cutting blade if you have one.


This is the flexible exhaust pipe you'll need. Cost about AUD$50 delivered on ebay for about 1m length. Some people use 2" stainless pipe - that'll work too.


So this is how the flexible exhaust sits inside the muffler. There's a little bit of play, but I'm hoping the length will stop it from moving. If you look at the muffler you'll see two pipes going into the muffler - measure & cut your exhaust hose so that it allows the entrance pipes to be unblocked. I cut mine to about 45cm.


Anyway, now to cleaning the old exhaust tips - don't think it was ever done since the car was new! First sprayed with a lot of degreaser and all-purpose cleaner and rinsed. Used a wire brush on an electric drill to buff off all the old stain and corrosion.


Then used metal polish and rags to try to brighten up the tips a little. They'll never look like chrome exhaust tips due to the brushed metal finish, but they're a lot cleaner at least.


Both done.


Finally, reinstallation of the exhaust tips is the reverse of disassembly.
Of course - you'll want to check out this video for sound before & after!


2004 cayenne turbo white smoke - not AOS but broken crankcase breather hose DIY repair

 So the other day noticed a huge amount of white smoke when starting the car cold, and a very high idle (1500rpm) when in neutral or park. R...